

Introduction
Real-Time communication or RTC has been a significant problem in computer science that’s tackled by a lot of engineers, it describes the responsiveness of a service within a specified time constraint, usually milliseconds or microseconds, between an event and its response deadline.
There are so many technologies that have been created and deployed at the production level, from which we can site:
- XMPP: Extensible Messaging and Presence Protocol (XMPP) is a communication protocol for message-oriented middleware based on XML, used mainly in IoT environments. I think this protocol is not used nowadays since the MQTT (message queue telemetry protocol) has shined which is a publish-subscribe protocol that enables near real-time communication between clients via what we call a broker
- WebRTC: It’s an API definition created by the W3C to enable browser-to-browser media communication like voice calls, video chats …
- Server-Sent Events: Or SSE for short, are a way for servers to initiate data transfer to clients after the client connects. It is used for streaming continuous or low latency messages to the client. The browser API is called EventSource.
- WebSockets: Our subject for today’s post, briefly, it’s a web technology that provides full-duplex, bidirectional communications channels over a single TCP connection
- And many many more protocols.
WebSockets
As we briefly stated in the introduction, WebSockets is an event-driven, full-duplex asynchronous communications channel for web and mobile applications, it has the ability to give you real-time updates that in the past you would use long polling (which was a hack to achieve RTC, where the server holds the request open until new data is available, once available, the server responds and sends the new information, the client would repeatedly do this operation to emulate a server push feature ).
The primary benefit of it is reducing resource needs on both client and server.
WebSockets architecture design
WebSockets is an HTTP connection upgrade, it uses HTTP as the initial transport mechanism, and the communication doesn’t end after a response is received by the client. Using the WebSockets API, you can be freed from the constraints of the typical HTTP request/response cycle.
This also means that as long as the connection stays open, the client and server can freely
send messages asynchronously without polling for anything new.
The following bloc shows the HTTP upgrade headers:
GET ws://localhost:8181/ HTTP/1.1
Pragma: no-cache
Origin: null
Host: localhost:8181
Sec-WebSocket-Key: qalODNsUoRp+2K9FJty55Q==
User-Agent: Mozilla/5.0 (Macintosh; Intel Mac OS X 10_8_3)...
Upgrade: websocket
Sec-WebSocket-Extensions: x-webkit-deflate-frame
Cache-Control: no-cache
Connection: Upgrade
Sec-WebSocket-Version: 13
HTTP/1.1 101 Switching Protocols
Connection: Upgrade
Sec-WebSocket-Accept: nambQ7W9imtAIYpzsw4hNNuGD58=
Upgrade: websocket
Modern browsers support WebSockets API which makes it easy to write event-driven apps in browsers.
The following code bloc shows a simple usage for web sockets client API:
let wsConnection = new WebSocket("ws://localhost:3000");

// attach on open event handler
wsConnection.onopen = () => {
    wsConnection.send("Hello server, I'm a new client, Am i Welcome :) ")
}

wsConnection.onerror = (e) => {
    wsConnection.send(`Oh ooh :(, I dont't know what happened ${e}`)
}

wsConnection.onmessage = (data) => {
    wsConnection.send(`Yaaay, I got new data, ${data.data}`)
}
Once the socket connection is created, we can attach event handlers to it which allows us to know when the connection is opened, when it receives messages and when there is an error.
In our demo app, we will be using socket io which is a wrapper over WebSockets and provides more features.
SocketIO
Before showing the demo app, let me introduce SocketIO, which has incredible features like
- Performance since it provides low-overhead communication between client and server
- Reliability: By default socketIO io uses WebSockets as the backbone protocol but when it fails to do so or the connection is impossible it will fall back to HTTP long-polling (described earlier).
- Scalability: Scaling web sockets is a hole discussion and it requires a lot of engineering, I hope we get the chance to see it in action in an upcoming post (after I learn it well and feel confident about it of course x) )
To learn more about socketIO I recommend going through their official docs that can be found here.
SocketIO main event flow
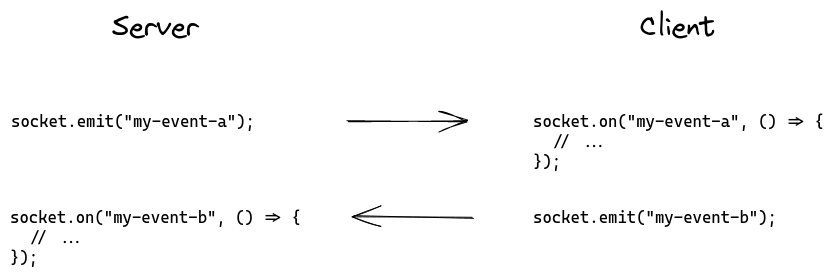
With socketIO we can either emit or listen to events:
- Emitting events: client and server can emit events along with an optional data
- Listening to events: client and server can listen to events in order to receive data the server or client has sent by emitting an event
With this, we are ready to tackle our demo app
Real-Time shared Pomodoro timer
To demonstrate the use of web sockets we will a simple version of this app which is suggested by a friend of mine.
For the frontend, I’ll be using react and for the backend, I’ll use nodejs
Server setup
To build the app we need to install express and socketIO, so we go with
npm install express socket.io
First, we define our Timer class which holds values and operations that deal with it
class Timer {
    constructor(value) {
        this.timer = value
        this.started = false

    }
    update() {
                // Timer value is of the following format
                // HH:mm:ss
        let ss = this.timer.split(":");
        let dt = new Date();
        dt.setHours(ss[0]);
        dt.setMinutes(ss[1]);
        dt.setSeconds(ss[2]);

        let newDate = new Date(dt.valueOf() - 1000);
        if (!newDate.getHours == 0 || !newDate.getMinutes == 0 || !newDate.getSeconds == 0) {
            var ts = newDate.toTimeString().split(" ")[0];
            this.timer = ts
        }
    }
}

module.exports = Timer
In the main source file, we have the following code
// 1. importing libs
const express = require('express');
const app = express();
const http = require('http');
const server = http.createServer(app);
const { Server } = require("socket.io");
const { clearInterval } = require('timers');
const Timer = require('./timer');
const io = require('socket.io')(server, {
    cors: {
        origin: '*',
    }
});

// 2.
let timer = new Timer("00:25:00");
let interval

// 3.
io.on("connection", (socket) => {

    socket.on("start", () => {
        if (!timer.started) {
            interval = setInterval(() => {
                timer.started = true
                // Call the update function and send the time value
                timer.update()

                                // Emit timer event
                io.sockets.emit("timer", {
                    success: true,
                    data: timer.timer,
                    error: null
                })
                console.log(timer.timer)

            }, 1000)
        } else {
            io.sockets.emit("timer", {
                success: false,
                data: null,
                error: "Timer already started"
            })
        }
    })

    socket.on("stop", () => {
        if (timer.started) {
            timer.started = false

                        // Stop timer
            clearInterval(interval)

                        // Emit timer event
            io.sockets.emit("timer", {
                success: true,
                data: timer.timer,
                error: null
            })
        } else {
            io.sockets.emit("timer", {
                success: false,
                data: null,
                error: "Timer already stopped"
            })
        }
    })

})


// 4.
server.listen(3000, () => {
    console.log("Server is running")
})
Let’s go through the code step by step.
- We start by importing express and socket io, express is the HTTP transport of the WebSocket connection used by socketIO. We allow cross-origin over WebSockets to enable connecting clients from different domains.
- Initializing the timer object, which is in our case hardcoded to 25 minutes
- The server listens for incoming connections and whenever a new socket connects it calls that function provided as a second parameter passing the socket object to it.
Once we have the socket object, we can emit and listen to events (as illustrated earlier).
We have two events that the server is listening to on start and stop events.
The
startevent starts counting down the timer and thestopevent stops the timer. At each timer tick, we send an event to all connected clients (rather than a specific socket) since the timer is shared between a lot of clients. - Starting the server
Note: We can enhance the server by creating rooms, so rather than sending the same timer values to all clients, we create multiple timers and room for each timer so that clients can join and leave the room and events are sent to the specific room only
client setup
For the client, we will be using socket.io-client to connect to the server using react.
In this app, I used react context api to share the socket state and have a single source of truth (aka store using redux jargon)
import React from "react";
import io from 'socket.io-client';
import { WS_URL } from "../../config/constants";


const SocketContext = React.createContext()
const SocketProvider = ({ children }) => {
    const socket = io(WS_URL)
    return <SocketContext.Provider value={socket}>
        {children}
    </SocketContext.Provider>
}

export {
    SocketContext,
    SocketProvider
}
We create the context and the provider which will wrap the app components tree to serve components the sockets object
<SocketProvider >
        <StyledApp>

                    {/*The timer components*/}
          <Timer />

          <Toggle onToggle={
            () => themeToggler()
          } />
        </StyledApp>
</SocketProvider>
Now let’s see how the Timer is built
const Timer = () => {
    const [time, setTime] = useState("00:25:00");
    const socket = useContext(SocketContext);

    useEffect(() => {

        if (socket) {
            console.log(socket)

            socket.on("timer", (data) => {
                if (data.success) {
                    setTime(data.data)
                } else {
                                    // show alerts
                }
            })
            return () => {
                socket.off("timer")
            }
        }

    }, [socket])

    const startTimer = () => {
        if (socket) {
            if (socket.connected) {
                socket.emit("start", "please start the timer")

            }

        }
    }
    const stopTimer = () => {
        if (socket) {
            if (socket.connected) {
                socket.emit("stop", "please stop the timer")
            }
        }
    }


        // StyledTimer and Controllers just div components styled using styled-components library
    return <StyledTimer>
        <Time>
            {time}
        </Time>
        <Controllers>
            <Button onClick={() => startTimer()}>start</Button>
            <Button onClick={() => stopTimer()}>stop</Button>
        </Controllers
    </StyledTimer>
}

export default Timer
- First, we initialise the time state and fetch the socket state from the context.
- We use the
useEffecthook in order to set up the event listener, in our case, we have one event that we should listen to which is thetimerevent to get the timer value each second - Then we define
startTimerandstopTimerfunctions that emitstartandstopevent
if we run the server and client we get the following:
Conclusion
Whenever you need a better low-latency connection between a client and server, WebSockets is your best option.
For more details about WebSocket I’ll link to some useful resources and for the source code of the demo as well
Don’t hesitate to reach out to me for any questions about any software engineering or ML-related topics
Thanks for reading